

WordPress is usually user-friendly, but sometimes you might come across errors that can be a bit worrying. The good news is that we will guide you here on Common WordPress Errors and How to Fix Them.
Before you attempt to fix any WordPress error, it’s crucial to have a full backup of your WordPress website. You can do this by using the Duplicator plugin or following a tutorial to manually create a backup of your WordPress site. Having a backup ensures that you can restore your site to its previous state if anything goes wrong during the error-fixing process.
If you can’t fix the issue using the steps mentioned in this article, it’s recommended to reach out to your WordPress hosting company for assistance. They can provide support and help you with resolving the problem you’re facing on your WordPress site.
Basic Steps for Troubleshooting Common WordPress Errors
Locating and fixing Common WordPress Errors can be tricky, but there are helpful strategies to tackle the issues causing you headaches.
Firstly, clearing your cache can resolve problems related to outdated content.
It’s crucial to keep your themes, plugins, and WordPress core up to date to prevent compatibility issues. If you encounter an error after installing a new plugin or theme, try deactivating it to see if that resolves the problem.
Regularly backing up your site is a good practice to quickly restore it in case of a major error.
Cloudways offers tools to assist in troubleshooting. They provide a free WordPress cache plugin, Breeze, which, when used with Varnish Cache, enhances page-loading speed by optimizing databases and enabling caching.
1. WordPress White Screen of Death
Imagine a beautiful morning – you wake up, get your coffee, and sit down at your workstation. Ready to begin your day, you open your laptop, start the browser, and enter your website’s URL with anticipation.
But, to your surprise and disappointment, all that greets you is a blank page. Despite hitting the refresh button multiple times, the site stays inaccessible.

If you’ve never come across the WordPress white screen of death, consider yourself lucky. In this section, I’ll guide you on how to fix this issue.
Increasing the Memory Limit
Both the web host and WordPress impose limits on PHP memory. However, when the available memory drops too low, it can lead to the dreaded White Screen of Death. Luckily, you can resolve these Common WordPress Errors by increasing the memory limit to ensure enough resources are allocated.
You can increase the PHP memory limit in various ways:
- Through Functions.php
- Through .htaccess File
- Through wp-Config.php
Functions.php
To do this, navigate to the root directory and then go to the folder of your current theme. Here’s an example, as shown in the image below:
/public_html/wp-content/themes/twentysixteen/function.php
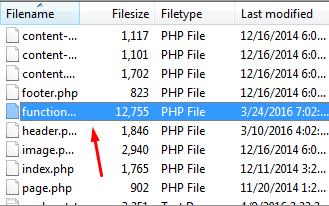
Download the functions.php file on your local server and add the following code at the top of the file.
@ini_set(‘upload_max_size', ’64M');
@ini_set(‘post_max_size', ’64M');
@ini_set(‘max_execution_time', ‘300');
.htaccess File
Next, edit the .htaccess file found in the main WordPress folders, like the wp-content and wp-admin folders.

Download the .htaccess file on your local server, add the following code, and then re-upload the file.
php_value upload_max_filesize 64M
php_value post_max_size 64M
wp-Config.php
In the third step, edit the wp-config.php file located in the root directory. Download wp-config.php and include the following code in it to resolve Common WordPress Errors.
Here’s the code below:
define(‘WP_MEMORY_LIMIT’, ’64M’);
ini_set(‘post_max_size’, ’64M’);
ini_set(‘upload_max_filesize’, ’64M’);

Deactivate All Plugins
If troubleshooting the memory limit doesn’t resolve the issue, try deactivating all your plugins. There’s a chance of a conflict between your active theme and the recently installed plugin.
To do this, go to the admin dashboard of your WordPress website and navigate to Plugins >> Installed Plugins.
Deactivate the plugins one by one and refresh your site after each deactivation. If your site starts working correctly, then the Common WordPress Errors is likely in one of the plugins. Now, activate each plugin one by one and refresh your website again after each activation. This process will help you identify the plugin causing problems.

Replace Theme With a Default Theme
If troubleshooting the plugin doesn’t solve the issue, don’t worry. You can move on to the next step, which involves replacing your current theme with a default theme, like twenty-sixteen. Before doing this, it’s a good idea to back up your theme folder and then delete the current theme.
By following these steps, WordPress will automatically switch to the default theme, resolving any theme-related Common WordPress Errors effectively.
Other Fixes
If none of the above solutions work, consider reinstalling a fresh version of WordPress. Additionally, you can use the debugging function if you want to see the types of Common WordPress Errors being displayed as output.
To enable debugging, add the following code to your wp-config.php file.
error_reporting(E_ALL); ini_set('display_errors', 1);
define( 'WP_DEBUG', true);
define( 'WP_DEBUG', true);
Debugging specific Common WordPress Errors can assist you in quickly resolving the WordPress white screen of death issue. You can also utilize a plugin for WordPress debugging, such as WordPress Query Monitor.
2. 500 Internal Server Error
Encountering the “500 error” is a common issue for website operators, including WordPress users. Thankfully, the cause of this error can often be identified relatively quickly. In WordPress, server Common WordPress Errors are frequently linked to issues with plugins and/or themes.

Corrupted .htaccess files or insufficient PHP memory can also contribute to internal server errors ( Common WordPress Errors ). It’s important to note that even though the rest of the website may function correctly, internal server errors can impact the WordPress admin page.
Fix 1: Corrupt .htaccess File
The most frequent cause of the error 500 is a corrupted .htaccess file. That’s why it’s essential to check this file first when you see this kind of error message.
Here’s what you can do:
- Connect to your server using FTP access.
- Go to the root directory of WordPress and find the .htaccess file.
- Rename this file temporarily.
- Refresh your website.
- Does it work? Congratulations!
Now, create a new .htaccess file by going to Permalink Settings in your WordPress Admin Panel and saving the settings again.
Fix 2: Insufficient PHP Memory
The error 500 can sometimes be due to a PHP memory limit issue. To check if this is the cause, you should examine your website’s error log.
Open the wp-config.php file and look for the following line of code.
Define ('WP_DEBUG', false);
And modify it as follows:
Define ('WP_DEBUG', true);
It’s a good idea to turn off plugins and themes one by one because an internal server error might be caused by one of them. By deactivating each one and checking your site, you can figure out which plugin or theme is causing the issue. If that doesn’t work, increasing the memory limit could also fix the problem.
Fix 3: The Core Is Damaged
It’s not common, but sometimes the core files of WordPress can get corrupted, leading to an internal server error. To fix this, you need to download a fresh set of core files to remove the source of the Common WordPress Errors.
Here’s what you can do:
- Log into your website using FTP access.
- Create new folders named wp-admin and wp-includes. Making changes in these folders typically doesn’t affect your WordPress customizations, unless you’ve modified files in these folders, which is uncommon.
Remember, the wp-content folder contains your theme, plugins, and other changes, so you don’t need to renew this folder. Renewing it could delete the content of your site.
If all else fails, download a new copy of WordPress from the official website and reinstall it completely.
3. Error Establishing Database Connection
For experienced WordPress users, fixing the common error “Error Establishing Database Connection” is usually quick. However, for beginners, this message can be confusing.

This error may occur when you manually install WordPress or try to upload your website. A good WordPress web host typically configures everything to prevent this error. But if you’re managing WordPress on your own, it can happen.
The crucial file here is wp-config.php among all the WordPress-PHP files. Without this file, your site can’t connect to the database, and it won’t work.
In wp-config.php, you set your login details like the database name, username, password, and host. This file is not usually editable for regular users. So, if you’re using managed WordPress hosting, this scenario may not be relevant to you.
Fix 1: Incorrect Connection Settings
If you encounter a WordPress error while trying to connect to the database, it’s often because of incorrect connection settings in the wp-config.php file. If you’re moving your website from one hosting company to another, you’ll need to make a change. Update the database name and password in your wp-config.php to ensure your database functions correctly.
// ** MySQL settings - You can get this info from your web host ** //

/** The name of the database for WordPress */

define( 'DB_NAME', 'database_name_here' );

/** MySQL database username */

define( 'DB_USER', 'username_here' );

/** MySQL database password */

define( 'DB_PASSWORD', 'password_here' );

/** MySQL hostname */

define( 'DB_HOST', 'localhost' );
Fix 2: Wrong Wp-config.PHP File
If you changed your database password and forgot to update your wp-config.php file, it can lead to Common WordPress Errors.
It’s a good practice to update your password regularly for database security. But when you do, remember to change the password both in your hosting control panel and in the wp-config.php file.
To fix this, upload your wp-config.php file, open a text editor, and edit the following line:
Define ('DB_PASSWORD', 'enter the password here');
Enter your new password, save the wp-config.php file, and download it using FTP. After that, reload your browser and check if your site loads correctly.
Fix 3: Problems With DB_HOST
After updating your wp-config.php to connect to your database on your new host, you might also need to change the DB_HOST value (the database host).
While this WordPress error is less common, it can happen. Certain hosting providers use their specific values for the database host parameter in wp-config. However, other hosts define a URL to the MySQL database server, which should be used as the value for the database host.
In some cases, using the IP hosting address instead of a MySQL URL might also work.
Fix 4: Error When Moving Your WordPress Site
Another cause of Common WordPress Errors is when you move your WordPress files to a new host. Initially, your website may display correctly when you access the URL. However, if you haven’t transferred your database to your new provider’s server after your former host terminates your contract, your site won’t be visible. You’ll see the WordPress error message “Error Establishing Database Connection.”
To prevent this issue, it’s best to promptly transfer the entire database to your new host. Update your wp-config.php file to connect to the new database. This way, you can safely cancel your old hosting account without losing any data and avoid the dreaded WordPress error message “Error Establishing Database Connection.”
Before troubleshooting, make sure to have a backup of your database by exporting your MySQL file.
4. Failed Auto-Upgrade
If the automatic update feature of WordPress doesn’t work, you might notice these symptoms:
- A blank white screen with no information.
- A warning stating that the update has failed.
- A PHP error message.
The failure of the automatic upgrade in WordPress can happen for various reasons, like a glitch in connection with the main WordPress files, problems with your internet connection during the upgrade, or incorrect file permissions.
To fix this, you can manually update your WordPress site by following these steps:
1. Replace WordPress Files:
- Download the latest WordPress zip (or tar.gz) file.
- Extract the downloaded file.
- Deactivate all plugins.
- Delete the old wp-includes and wp-admin directories from your web host.
- Upload the new wp-includes and wp-admin directories to your web host, replacing the deleted ones.
- Overwrite the existing files in your wp-content folder by uploading the new files from the wp-content folder in the downloaded package. Don’t delete your wp-content folder or any files within it.
- Upload the new loose files from the root directory of the new version to your existing WordPress root directory.
Make sure not to overwrite any customized themes or plugins unless it’s necessary.
2. Remove .maintenance File:
- If you manually update your WordPress site following a failed auto-upgrade, make sure to delete the .maintenance file from your WordPress directory using FTP.
3. Update Your Installation:
- Visit your WordPress admin page at /wp-admin and log in if prompted.
- If a database upgrade is required, WordPress will detect it and provide a link to upgrade.php. Follow the link and instructions to update your database.
- Reactivate your plugins.
4. Clear Caching (if applicable):
- If caching is enabled, make sure to clear the cache. This ensures that the changes are immediately visible. Otherwise, cached versions may continue to be displayed.
5. Final Steps:
- Enable your plugins again. If you experience login issues, try clearing your browser cookies.
By following these steps, you can successfully perform a manual update of your WordPress installation, ensuring you have the latest version with all the necessary improvements and bug fixes.
5. Fixing the Sidebar Below Content Error
The problem of the sidebar appearing below the content in WordPress can mess up the layout and be quite frustrating. This issue is common in templates with a two-column layout and is usually caused by HTML or CSS errors that impact the positioning of the sidebar.
Troubleshooting Steps:
To fix the sidebar appearing below the content error, follow these steps:
- Undo Recent Changes: If you recently made changes to your WordPress theme, revert those changes to see if the issue is resolved.
- Rule Out Plugin Conflicts: Temporarily deactivate all plugins and check if the problem persists. If the error disappears, reactivate the plugins one by one to identify the conflicting plugin.
To address the sidebar below content error, search for HTML errors, especially unclosed or orphaned
tags in the template responsible for displaying the affected content. Utilize tools like the W3C Validator or code editors to identify and fix HTML errors.

To fix the issue of the sidebar appearing below the content in WordPress, follow these additional steps:
- Check CSS Settings: Inspect the CSS code and ensure that the width allocation for the content and sidebar areas is correct. Incorrect width settings can cause the sidebar to shift below the content. Adjust the CSS accordingly.
- Clear WordPress Cache: Clear the cache to ensure that any cached versions of your pages are updated. This helps to avoid displaying outdated content and resolves potential caching issues.
Resolving this issue significantly enhances the user experience on your website by restoring the correct layout.
6. Fixing White Text and Missing Buttons in WordPress Visual Editor
If you’re using the classic WordPress editor and facing issues where buttons in the visual editor disappear or show blank white spaces, it’s crucial to understand the potential causes of this problem.

The issue of disappearing or blank buttons in the classic WordPress editor’s visual editor may be caused by the following reasons:
- Concatenated JavaScript: Problems may arise when concatenated JavaScript is not working correctly. This could be due to conflicts with other plugins or themes that modify or extend the default TinyMCE editor in WordPress.
- Missing or Corrupt TinyMCE Files: Another possible cause is the absence or corruption of essential TinyMCE files. When these files are missing or damaged, it can lead to the malfunctioning of buttons and the visual editor’s interface.
- Plugin Conflict: Conflict with another plugin that modifies or extends the functionality of TinyMCE can also cause this issue. Some plugins may interfere with the proper functioning of the visual editor, resulting in the disappearance or incorrect display of buttons.
To troubleshoot and resolve this problem, follow these steps:
- Clear the Browser Cache: Start by clearing your browser’s cache or try using a different browser. This can help resolve the issue related to a caching problem on your computer.
- Replace TinyMCE Scripts: If the problem persists, try replacing the /wp-includes/js/tinymce/ folder with a fresh copy. This ensures that the necessary TinyMCE files are intact and can potentially fix the issue.
- Update wp-config.php: If the above steps do not resolve the problem, edit your wp-config.php file. Add the following line at the very top, just after the opening PHP tag:
define('CONCATENATE_SCRIPTS', false);
This configuration change can help address the issue related to concatenated JavaScript not working.
By following these troubleshooting steps, you can effectively resolve the issue of missing buttons or blank spaces in the visual editor of the classic WordPress editor.
7. Fixing the WordPress Memory Exhausted Error – Increasing PHP Memory
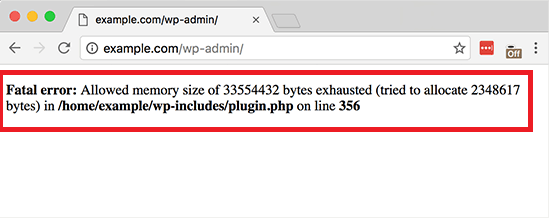
The WordPress Memory Exhausted Error can appear as a white screen of death or an error message stating that the allowed memory size has been exhausted. This error occurs when a WordPress script or plugin exceeds the default allocated memory limit.
Fatal error: Allowed memory size of 33554432 bytes exhausted (tried to allocate 2348617 bytes) in /home/example/wp-includes/plugin.php on line 356
To address the WordPress Memory Exhausted Error and avoid issues related to the default memory limit, follow these steps:
- Edit the wp-config.php File: Find the wp-config.php file in your WordPress site’s root folder using an FTP client or file manager in your hosting control panel.
- Insert Memory Limit Code: Add the following code snippet just before the line that reads ‘That’s all, stop editing! Happy blogging.’
define('WP_MEMORY_LIMIT', '256M');
This code instructs WordPress to increase the PHP memory limit to 256MB. Adjust the value as needed for your website’s requirements.
Save and Upload: Save the changes to the wp-config.php file and upload it back to your server.
Upon completing these steps, visit your WordPress site, and the memory exhausted error should no longer appear.
Note: If this solution does not work, it may indicate that your web hosting service provider does not permit WordPress to increase the PHP memory limit, which is common with shared hosting. In such cases, contact your hosting provider to inquire about manual adjustment of the memory limit for your WordPress site.
8. Locked Out of WordPress Admin (wp-admin)
Can’t Access WP-Admin? Various situations can lead to a lockout from the WordPress admin area. For example, forgetting your password and not having access to the password recovery email can result in such a situation. Similarly, installing a plugin or using code that unintentionally tries to modify the admin section can also lead to a lockout. Additionally, if your WordPress site has been compromised by a hacker, you may lose access to the admin area.
WordPress admin access issues can be challenging for administrators, as they can stem from a variety of factors.
Let’s explore the potential reasons for getting locked out of the WordPress admin area and provide solutions to help you regain access. We’ll organize these issues into different sections for convenient reference.
1. Troubles with Database Connection
A common error message you may come across is the ‘Error establishing database connection.’ This could indicate a compromised database or issues with your web hosting server.
Error establishing database connection

2. Internal Server Error – 500
As a WordPress beginner, you might encounter the “Internal Server Error” or “500 Internal Server Error”. This ambiguous error occurs when there is an unidentified problem.

3. ‘Not Found’ Error – 404 Error
Misconfiguration of WordPress Address and Site Address settings can often lead to the 404 error message when trying to access your admin area. If you’re facing this problem, modifying your WordPress site URLs could help.
Here is one approach to change the WordPress site URLs using the functions.php file:
- If you are unable to access the WordPress admin panel, connect to your WordPress site through an FTP client.
- Locate the WordPress theme folder, typically located at /wp-content/themes/your-theme-folder/.

Open the functions.php file within your theme folder using a text editor like Notepad or TextEdit.
Add the following code snippet at the end of the functions.php file:
update_option('siteurl', 'https://yourdomain.com');
update_option('home', 'https://yourdomain.com');
Make sure to replace ‘https://yourdomain.com’ with your actual site’s URL.
Save the changes and upload the modified functions.php file back to the server using the FTP client.
Visit your website to verify if everything is functioning correctly.
The advantage of this method is that it updates the site URLs directly in the database. WordPress automatically updates the database with the new URLs every time the functions.php file is loaded.
Once your website is working properly, you can remove the two lines of code from the functions.php file in your WordPress theme.
4. Forbidden Error – 403
The “HTTP Error 403 – Forbidden” message may appear when you try to access wp-admin. Causes for this error could range from incorrect file permissions and poorly-constructed security plugins to server configurations. Should you encounter this error, this guide on mitigating the 403 Forbidden Error in WordPress might be able to assist.

5. Unauthorized Error – 401
The 401 error message, sometimes accompanied by ‘Access denied due to invalid credentials’ or ‘Authorization required,’ could be seen if your WordPress admin folder is password-protected.
It can also occur due to a WordPress security plugin or actions taken by your hosting company.
Here are some solutions to troubleshoot and resolve a 401 error in WordPress:
1. Refresh the Firewall Cache
401 errors can occur if a cloud-based WordPress firewall service, such as Sucuri or Cloudflare is one of the most Common WordPress Errors, fails to connect with your website. Clearing the firewall cache might resolve this. Here’s how:
For Sucuri Users:
- Log into your Sucuri dashboard, navigate to the ‘Firewall (WAF)’ page, and switch to the ‘Clear Cache’ tab.
- Click on the ‘Clear cache’ button.
For Cloudflare Users:
- Log into your Cloudflare dashboard, go to the ‘Caching’ section, and click on the ‘Purge everything’ button.
- After you’ve cleared the firewall cache, clear your browser cache or WordPress cache as well.
2. Temporarily Deactivate Password Protection for WordPress Admin
At times, password protection for your WordPress admin directory could lead to a 401 error, particularly if you’ve forgotten the password or your server configuration has changed. To resolve this, you’ll have to temporarily disable the password protection by:
- Logging into your WordPress hosting control panel and accessing the ‘Directory Privacy’ or ‘Password Protected Directories’ option.
- Browsing to your wp-admin directory and deselecting it by clicking on the name.
- Navigating to password protection settings and unchecking the ‘Password protect this directory’ option. Save the changes.
- Deleting the username for your password-protected directory.
Try logging into your WordPress site. If it’s successful, you can re-enable password protection with a new username and password.
3. Disable All WordPress Plugins
A problematic or improperly configured WordPress plugin can cause a 401 error. Try temporarily deactivating all your WordPress plugins. This can be done from the Plugins page in the admin area or via FTP if you can’t access the admin area. Here’s the process for the latter:
- Connect to your WordPress site using an FTP client.
- Navigate to the /wp-content/ folder and rename the plugins folder to ‘plugins.deactivated’. This will deactivate all WordPress plugins.
After checking if the issue has been resolved, rename the plugin’s folder back to ‘plugins’ and reactivate plugins one at a time to identify the faulty one.
4. Reset WordPress Password
Repeated failed attempts to log in to your WordPress account can lead to temporary blockage of access to wp-admin and login pages, resulting in a 401 error. If you’ve forgotten your password, opt for password recovery instead of repeated attempts. If WordPress fails to send a password reset email, you can reset your password using phpMyAdmin.
5. Use a Default WordPress Theme
A function within your WordPress theme can trigger a 401 error. To determine if this is the case, switch to a default WordPress theme, such as Twenty Twenty-Two or Twenty Nineteen. If the issue is resolved after the switch, your theme was causing the 401 error.
Limited Login Attempts
By default, WordPress allows users to attempt password entry an unlimited number of times. This can be exploited by hackers using scripts to attempt various combinations until access is gained.
Hence, it’s recommended to limit the number of failed login attempts per user. However, should you lock yourself out due to too many incorrect attempts, here’s what you can do:
A beginner-friendly solution involves removing the folder named “Limit Login Attempts Reloaded” and later reinstalling the plugin after regaining access to your WordPress site. To implement this method, you can utilize either an FTP client or the file manager feature provided in your WordPress hosting control panel.
If you’re unfamiliar with FTP, we recommend referring to our comprehensive guide on utilizing FTP for uploading files to WordPress.
To proceed, you must access your site through your FTP client or file manager and navigate to the /wp-content/plugins/ directory. Once you’ve reached this location, you can proceed to delete the folder named “limit-login-attempts-reloaded” associated with the plugin.

By completing this step, you should now be able to successfully log in to your WordPress admin area.
The White Screen of Death
A white screen appearing on your WordPress admin, commonly known as the WordPress white screen of death, usually signals a depleted memory limit.
Incorrect Password
Entering the wrong password and being unable to reset it can be frustrating. Should this happen, don’t worry! This guide on how to reset your WordPress password could assist.
Plugin-Related Problems
Sometimes, faulty plugins or themes lock you out of your WordPress site. If you can’t log in after installing a new plugin or the error message mentions ‘wp-content/plugins/’, deactivating your plugins might solve the problem.
You have two commonly employed methods to deactivate plugins when you cannot access the admin area of your WordPress website. You can opt for the method that seems more convenient to you.
Method 1: Deactivating All WordPress Plugins Using FTP
Method 2: Deactivating All Plugins Using phpMyAdmin
Let’s focus on the first method. To execute this approach, you must utilize either an FTP client or the file manager feature provided in your WordPress hosting control panel.
- Start by connecting to your website using your preferred FTP client or accessing the file manager in cPanel.
- Once connected, navigate to the /wp-content/ folder.
- Inside the wp-content folder, you will find a folder named “plugins.” This particular folder is where WordPress stores all the plugins installed on your website.

To proceed, right-click on the plugins folder and select the “Rename” option. Then, modify the name of the plugins folder to any desired name. For demonstration purposes, let’s refer to it as “plugins.deactivate.”
As a result, all your plugins will be deactivated. This happens because WordPress searches for a folder called “plugins” to load the plugin files. When the folder is not found, WordPress automatically disables the active plugins stored in the database.
Usually, this method is employed when you cannot access the admin area. If the issue was caused by your plugins, you should now be able to log in to your WordPress admin area.
Upon visiting the “Plugins » Installed Plugins” page within the WordPress admin area, you will observe notifications indicating that all the plugins have been deactivated.
You may also notice that all your plugins have disappeared. Do not worry, as they are all safe and can be easily restored.
Simply switch back to your FTP client and navigate to the /wp-content/ folder. From here, rename the “plugins.deactivate” folder back to “plugins.”
At this point, you can return to the “Plugins » Installed Plugins” page within the WordPress admin area and activate one plugin at a time until your site reencounters issues.
Following this process, you can identify the specific plugin that caused the problem. You can then remove that plugin’s folder from your site using FTP or seek support from the plugin author.
Lost Admin Rights
In some cases, you might be able to log into your WordPress admin but lack the usual admin functionality. This could indicate modified user permissions or a potential hack. In such a scenario, adding an admin user to the WordPress database might be helpful.
WordPress has six main user roles with distinct capabilities:
- Super Admin: Full access to the entire website, including network administration.
- Administrator: All administrative privileges, such as user management, plugin/theme installation, and site settings modification.
- Editor: Can create, edit, and publish their own posts and manage others’ posts.
- Author: Can create, edit, and publish their own posts but not posts from other users.
- Contributor: Can create and edit their own posts but require review from an editor or administrator for publishing.
- Subscriber: Limited access, focused on managing profiles and leaving comments on posts.
Experiencing Technical Issues
In certain situations, you might encounter a white screen or a message that says, ‘The site is experiencing technical difficulties.’ If this happens, log into your admin email account and look for an automated email from WordPress. This email will give you information about the theme or plugin causing the issue.
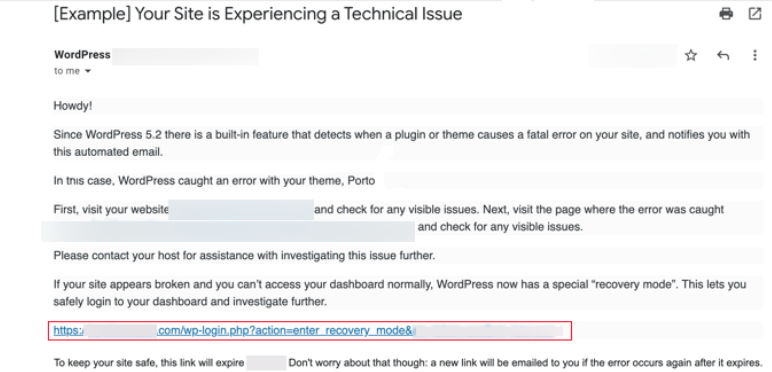
If you don’t receive the recovery email, you can still access recovery mode without it by following these steps:
- Replace “example.com” with your website’s domain in this URL: example.com/wp-login.php?action=entered_recovery_mode
- Copy the modified URL and paste it into your browser’s address bar.
- The URL will take you to the WordPress admin area, where you’ll need to log in.
- On the login page, you’ll see a notification stating that you are logging into Recovery Mode.
- Once logged in, address any Common WordPress Errors on your site.
It’s important to know that this method won’t automatically identify the problematic plugin or theme. You’ll have to troubleshoot manually. Start by changing your theme to a default WordPress theme or deactivating all plugins, which should resolve the error and allow access.
Then, reactivate plugins one by one to find the problematic ones. Consider reverting to an earlier theme or WordPress version if compatibility issues arise.
Keep in mind that various factors can lock you out of the WordPress admin area, but we’ve covered common issues and provided solutions for them.
9. Fixing WordPress Login Page Refreshing and Redirecting Issue
Dealing with the mysterious issue of the WordPress login page refreshing and redirecting is relatively simple to fix. It requires a short troubleshooting effort on your part, but we’ll break it down to make it as simple as possible.
Clear Cookies to Resolve Login Issues
WordPress scripts use cookies stored in your browser for security reasons. While they validate your login data, these cookies can occasionally lead to problems, such as being redirected back to the login page.
To resolve this issue, clear your browser’s cookies and cache. This simple step should address the problem.

After clearing the cookies and cache, restart your browser, and attempt to log into your account. This should resolve the issue for the majority of users.
Deactivate All Plugins
Already mentioned earlier.
Check Your Theme
Already mentioned earlier.
Delete .htaccess File Code
If clearing your browsing data doesn’t resolve the login issues, consider trying the following step: deleting the .htaccess file. In some cases, this file can become corrupted, leading to internal server errors or login page refreshing problems. To do this, access your website through FTP using a tool like FileZilla. Provide the following details:
- Host
- Username
- Password
- Port
This allows you to navigate to your website files and address potential issues with the .htaccess file.

Follow these steps to resolve potential issues with the .htaccess file:
- Access your website using an FTP tool like FileZilla, providing the necessary details (Host, Username, Password, Port).
- Navigate to your website’s root directory and locate the .htaccess file.
- Delete the code in the .htaccess file.
- Attempt to log in again. If successful, it indicates that the .htaccess file was causing the login issue.
- Once logged in, go to Settings » Permalinks and click Save. This action generates a new .htaccess file.
These steps should help you address problems related to a corrupted .htaccess file and allow you to log in to WordPress successfully.
Update Site URL
If the solution involving deleting the .htaccess file doesn’t resolve the issue, consider trying to update your site URL. Occasionally, login problems can arise from a broken site URL. To address this, you can update the URL of your site by adding two lines of code to your “wp-config.php” file. Remember to replace “example.com” with your actual URL. This adjustment should, hopefully, fix the WordPress login redirect issue.
The code to be added is:
define('WP_HOME','http://example.com');
define('WP_SITEURL','http://example.com');
Once it is done, you should be able to resolve WordPress Login Page Refreshing and Redirecting Issue to WordPress without any problem!
10. Fixing Image Upload Issue in WordPress
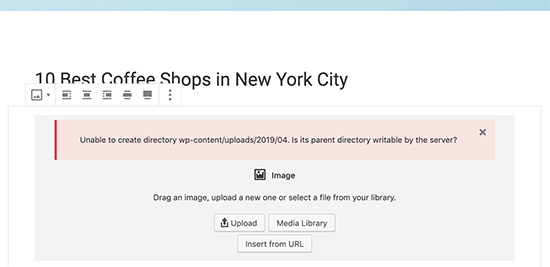
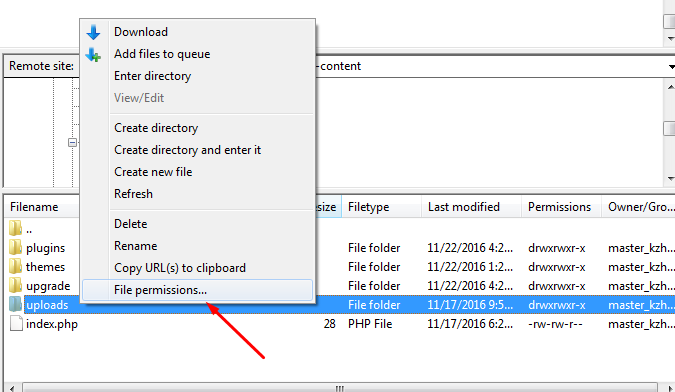
If you’re experiencing broken images in your WordPress Media Library and encountering difficulties uploading images, there might be an issue with the file permissions of your Uploads directory.
Unable to create directory vvp-content/uploads/2023/10. Is its parent directory veritable by the server?
How to Manually Set Your File Permissions
To address this issue, navigate to your website’s directory using an FTP client like FileZilla. Go to the /wp-content/ directory, where you’ll find the /uploads/ folder. Right-click on the uploads directory and select “File Permissions.”
If changing the permission from 744 to 755 didn’t resolve the issue, follow these steps:
- Change the permission to 755.
- Press the OK button.
- Check the box next to “Recurse into subdirectories.”
- Select the “Apply to directories only” radio button.
- Press the OK button.
These adjustments, especially applying the changes to directories only, can help address file permission issues in your WordPress Uploads directory.

Once it is done, you should be able to upload images to WordPress without any problem!
11. Fixing WordPress Keeps Logging Out Problem
If you’ve been using WordPress for a while, you may have encountered the issue of being logged out unexpectedly. This problem, often referred to as the session timeout issue, can be quite frustrating, especially when you’re in the midst of saving important settings. Various reasons contribute to this problem, and some of them are listed below:
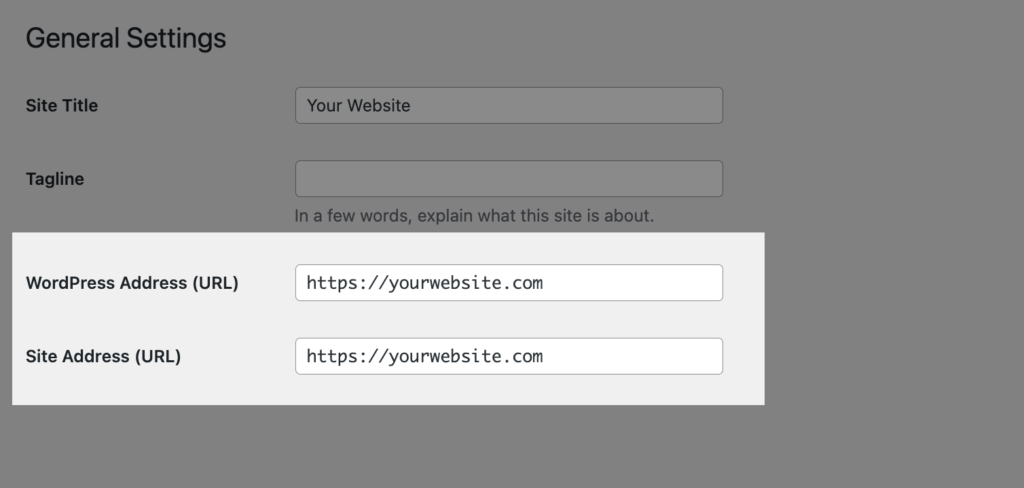
Incorrect Setting
You should take a look at the image below; notice that the WordPress URL and the Site Address are two different URLs (one includes www., while the other doesn’t).
To resolve this login issue, ensure that the URL in your WordPress settings matches both the WordPress URL and the Site Address. They should be the same to avoid login problems.
FTP Configuration
If you can’t access the admin area, another option is to add a snippet of code to the wp-config.php file. Connect to your website through FTP and find the wp-config.php file in your site’s root directory. Download the file to your local server and open it in a text editor like Dreamweaver or Notepad. Copy and paste the following code into your wp-config file.
define('WP_HOME','http://www.example.com');
define('WP_SITEURL','http://www.example.com');
Ensure to replace “example.com” with your actual domain name. After making the changes, save the file and upload it back to your website’s root directory. This step is crucial for applying the modification to the wp-config.php file.
12. The Taskbar Appears Under the Main Content
If you encounter the common WordPress error where your sidebar appears below the main content instead of beside it, it can impact both the aesthetics and functionality of your website. Despite the layout appearing disrupted, it doesn’t mean you can’t continue using your theme. This sidebar error can often be swiftly corrected.
A frequent cause of this issue is an imbalance in the number of open and closed div tags in your HTML. Div tags, represented as
<div></div>
in your WordPress page’s code, play a crucial role in structuring your website’s elements. If there are too few div tags or they are not used correctly, especially in the layout, issues may arise. If the problem is isolated to a specific section or page, div tags are likely the culprit. An efficient way to identify div tag errors is to utilize an online HTML validator.
Additionally, a mistake in your CSS style sheet could be triggering the problem, especially if recent modifications have been made. Inconsistent size specifications for the main content and sidebar in your CSS can disrupt the layout. Incorrect instructions or excessive padding may also result in a misrepresentation of your website.
Consider disabling the float property of your sidebar through CSS to prevent it from aligning left or right. Verify the float definition to rule out any potential sources of error.
13. Syntax Error
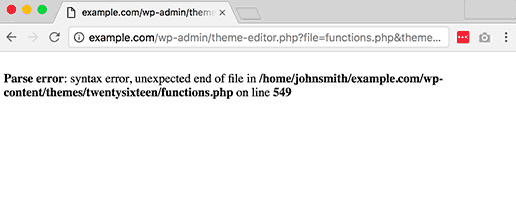
A minor typo error in the wrong place can result in the shutdown of your entire WordPress page. However, the “Syntax Error” message is not an insurmountable problem.
A syntax error usually occurs due to a critical error in the code’s syntax, such as a missing comma or parenthesis. For instance, if you have a line of code that should be written as:
echo "Hello, World!";
However, due to a syntax error, you accidentally write it as:
echo "Hello, World!
It’s important to note that even a small mistake like missing a closing quotation mark can lead to a syntax error, disrupting script execution.
If you recently added a snippet or updated a plugin and encounter a syntax error, it’s crucial to check those first.
To resolve WordPress Common WordPress Errors syntax errors, focus on the part of the code causing the issue. You can either delete it entirely or correct the syntax. For beginners, it’s understandable to feel frustrated when a single mistake renders the entire site inaccessible.
If you added the code through the WordPress dashboard editor and can no longer access it, the only way to fix the syntax error is via FTP.
Here’s how:
- Log in to your FTP program and navigate to the directory where the affected theme file is located, as indicated by the error code.
- Either remove the newly added code entirely or correct the syntax.
- Save the file and upload it to your server.
- Access your website without using cached data, and it should function properly again.
14. Fixing the “Are You Sure You Want to Do This” Error in WordPress
The “Are you sure you want to do this?” error in WordPress can arise from problems with nonce verification, a security feature designed to safeguard your website from unauthorized access. This error is often triggered by plugins or themes that fail to implement nonce properly.

To resolve the “Are you sure you want to do this?” error in WordPress, you can take the following steps:
Investigate Plugins:
- Deactivate all plugins on your WordPress site by renaming the “plugins” folder via FTP or the File Manager.
- Reactivate each plugin one by one to identify the one causing the error.
Investigate Themes:
- If the error persists, your theme may be the issue.
- Download a backup of your current active theme and delete it from your web server. WordPress will revert to the default theme.
- If the error disappears, the theme was causing the issue.
Unable to Find the Source:
- If neither plugins nor themes are causing the error, you can replace all core WordPress files with fresh copies.
- Make a complete backup of your website.
- Delete all WordPress files except the “wp-content” folder.
- Download a fresh copy of WordPress and upload the files to your server.
- Edit the wp-config.php file with your database information.
By systematically investigating plugins, themes, and core files, you should be able to identify and fix the source of the “Are you sure you want to do this?” error in WordPress.
15. Fixing the Briefly Unavailable for Scheduled Maintenance Error in WordPress
The ‘Briefly unavailable for scheduled maintenance‘ error in WordPress occurs when your website gets stuck in maintenance mode during an update, displaying this message to visitors.
Access Files: Use FTP or the file manager in your hosting control panel to navigate to your website’s root folder.
Delete ‘.maintenance’ File: Locate and delete the ‘.maintenance’ file. This action takes your site out of maintenance mode.
By removing the ‘.maintenance’ file, you resolve the error and allow your website to return to normal operation.

In summary, to fix the ‘Briefly unavailable for scheduled maintenance’ error in WordPress:
- Access your website’s files through FTP or the file manager.
- Locate the ‘.maintenance’ file in the root folder.
- Delete the ‘.maintenance’ file.
- Refresh your website, and the error should be resolved.
16. Fixing WordPress Not Sending Email Issue
The WordPress not sending email issue is a common problem, often caused by improper server configuration or emails being marked as spam by providers. To address this, using SMTP (Simple Mail Transfer Protocol) is recommended. The WP Mail SMTP plugin can help configure WordPress to use SMTP instead of the PHP mail() function. Follow these general steps:
- Install and activate the WP Mail SMTP plugin on your WordPress site (Here’s a guide on setting up WordPress SMTP).
- Configure the plugin settings by entering the name and email address from which you want emails sent.
- Choose an SMTP mailing service provider like Sendinblue, Gmail (G Suite), Office365, or others.
- Follow the specific instructions provided by your chosen SMTP service provider to set up an account and obtain the required credentials.
- Connect your WordPress site with the SMTP service provider by entering the necessary details in the WP Mail SMTP plugin settings.
- Test the email functionality by sending a test email through the WP Mail SMTP plugin.
By using SMTP, you enhance email deliverability and reduce the likelihood of emails being flagged as spam. Note that steps may vary based on your chosen SMTP service provider.
17. Fixing WordPress RSS Feed Errors
If your WordPress site has problems with its RSS feed, it can stop people from subscribing to your blog and cause issues with other apps that use your feed. These problems usually happen because of mistakes in the XML markup language used for RSS feeds.
Here’s how to fix RSS feed errors in WordPress:
- Manually Fixing Format: Examine your theme’s functions.php file or any added code snippets for formatting issues. Eliminate unnecessary spaces or line breaks after the closing PHP tag. For future code snippets, think about using a plugin like WPCode.
- Disable RSS Feed Plugins: If you’re experiencing issues, try temporarily turning off any plugins that modify or create RSS feeds. Gradually reactivate each plugin to pinpoint the one causing the problem. Reach out to the support of the problematic plugin for an update, or look for an alternative plugin if needed.
- Switch to a Default Theme: To check if the issue is related to your current theme, switch to a default WordPress theme like Twenty Twenty-Three. If the error goes away, get in touch with the theme author for assistance or think about changing to a different theme.
18. Fixing 403 Forbidden Error in WordPress
The 403 Forbidden error is an HTTP status code that pops up when you attempt to access a resource without the necessary permission. Possible reasons for this error include improper configuration, a corrupted .htaccess file, poorly coded plugins, or incorrect file permissions.
To resolve the 403 Forbidden error in WordPress, you can consider the following solutions:
- Clear your browser cache and cookies.
- Roll back to a previous working version of your website using a backup.
- Examine and fix your .htaccess file by removing any extra spaces or line breaks.
- Verify and correct file permissions to ensure they are set correctly.
- Temporarily deactivate all plugins and reactivate them one by one to identify the problematic plugin.
- Review and adjust hotlink protection settings if enabled.
- If the error persists, contact your hosting provider for assistance.
19. Fixing Error Too Many Redirects Issue in WordPress
The “Error too many redirects” problem in WordPress usually arises from a misconfigured redirection or conflicts with plugins. This issue can prevent users from accessing their websites and disrupt the normal functioning of the site.

To resolve the “Error too many redirects” problem in WordPress, you can attempt the following solutions:
- Clear browser cookies and cache.
- Deactivate all WordPress plugins by renaming the plugins folder via FTP.
- Ensure consistency between the WordPress Address and Site Address settings to fix WordPress URLs.
- Reset the WordPress .htaccess file by downloading a backup, deleting the existing file, and refreshing permalinks.
- If the issue persists, contact your WordPress hosting provider for assistance.
20. Fixing “Upload: Failed to Write File to Disk” Error in WordPress
The “Upload: Failed to write file to disk” error in WordPress happens when incorrect folder permissions prevent the web server from writing or creating files in the designated folder. This issue commonly arises during file uploads and can be frustrating for users.

To fix the “Upload: Failed to write file to disk” error, follow these steps:
- Connect to your WordPress site using an FTP client.
- Right-click on the wp-content folder and choose “File Permissions.”
- Set the numeric value to 755 and enable the “Recurse into subdirectories” option. Click “OK” to apply the changes to folders.
- Right-click on the wp-content folder again and select “File Permissions.”
- Set the numeric value to 644 and enable the “Recurse into subdirectories” option. Click “OK” to apply the changes to files.
- Attempt to upload files again in your WordPress admin area.
- If the error persists, contact your WordPress hosting provider for further assistance.
21. Fixing “This site ahead contains harmful programs” Error in WordPress
If you come across the “This site contains harmful programs” error on your website, it signals that your site may have been compromised, leading Google to flag it as insecure. This warning is shown to safeguard users from potential malware or trojan distribution. Additionally, ads from low-quality advertising networks could be a trigger for this error.

To resolve this issue, follow these steps:
- Confirm that your website is hacked and remove the malware. Use scanning tools or services to detect and eliminate any malicious code. Ensure you have a backup of your website before proceeding.
- Search for and eliminate any backdoors that may have been placed on your site. Backdoors allow unauthorized access and can reinfect your website even after cleaning it. Find and close any security vulnerabilities, such as compromised passwords or unsafe file permissions.
- Thoroughly check all your files and the database for any remaining malicious code. Pay close attention to disguised or hidden files that may have been injected into your site.
- Consider using a website monitoring and security service like Sucuri. It provides continuous monitoring, protection against hacking attempts, and malware cleanup for WordPress sites.
- Once you have ensured your website is clean, request a review from Google through Google Webmaster Tools. Provide details about the steps you’ve taken to fix the issue and ask them to remove the warning from search results.
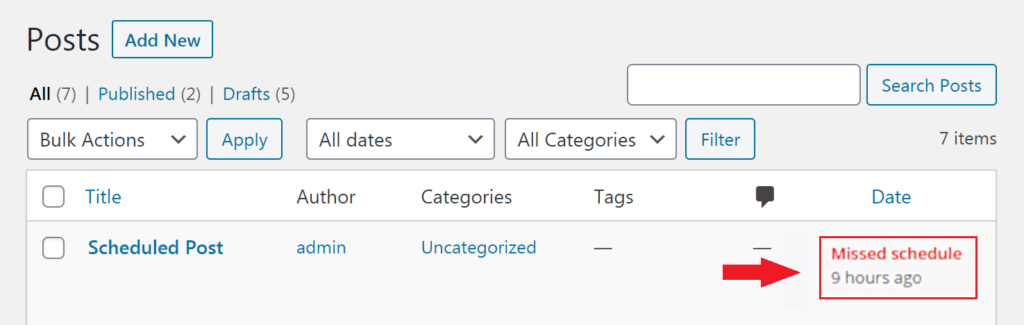
22. Fixing the Missed Schedule Post Error in WordPress
If you’re facing the “missed schedule post” error in WordPress, where your scheduled posts aren’t published on time, several potential causes exist. This problem might stem from issues with your web hosting environment or conflicts with plugins.
To resolve the “missed schedule post” error in WordPress, follow these steps:
- Install and activate the “Missed Scheduled Post Publisher” plugin. This plugin checks your website every 15 minutes, detecting any missed scheduled posts and automatically changing their status to “published.”
- Check your WordPress timezone settings to ensure they match your desired timezone for publishing and managing your website. Go to Settings » General and select the appropriate timezone.
- Clear the WordPress cache if you’re using a caching plugin. Poorly configured caching plugins can sometimes cause issues with scheduled posts. Make sure your caching plugin is set to automatically clear the cache at regular intervals.
- Increase the WordPress memory limit by editing the wp-config.php file. Add the following code before the line that says ‘That’s all, stop editing! Happy publishing.’: define(‘WP_MEMORY_LIMIT’, ‘500M’). This allows WordPress to use more server memory and can help prevent issues with scheduled posts.
- Disable the default WordPress cron (wp-cron) and set up a new cron job on your web hosting provider’s operating system. This ensures that scheduled tasks, including publishing scheduled posts, are properly executed. Refer to our guide on how to disable wp-cron and set up cron jobs in WordPress for detailed instructions.
Common WordPress Errors – Common WordPress Errors – Common WordPress Errors – Common WordPress Errors – Common WordPress Errors – Common WordPress Errors – Common WordPress Errors – Common WordPress Errors – Common WordPress Errors – Common WordPress Errors – Common WordPress Errors – Common WordPress Errors – Common WordPress Errors – Common WordPress Errors – Common WordPress Errors – Common WordPress Errors – Common WordPress Errors
23. Fixing Fatal Error: Maximum Execution Time Exceeded in WordPress
If you’re facing the “Fatal error: Maximum execution time of 30 seconds exceeded” in WordPress when attempting to update a plugin or theme, it indicates that the PHP script is taking too long to run, surpassing the maximum time limit set by your hosting server. This limit is imposed to prevent abuse of server resources.

To address the “Fatal error: Maximum execution time of 30 seconds exceeded” issue in WordPress, consider the following steps:
- Use WordPress Recovery Mode:
If you’re using WordPress version 5.2 or higher and see the “This site is experiencing technical difficulties” error message, log in to WordPress using the provided Recovery Mode link. From there, deactivate or delete the plugin causing the error. - Edit Your .htaccess File:
Connect to your website using an FTP client or File Manager app. Locate the .htaccess file in the root folder, edit it, and add the following line at the bottom:
php_value max_execution_time 300
Save the file and check if the error is resolved.
- Modify the php.ini File:
If there’s no php.ini file in your root folder, create one and add the following line:
max_execution_time = 60
Save the file and upload it to the server.
After applying these methods, check your website to see if the error persists. In most cases, increasing the maximum execution time using these techniques will resolve the issue. If the error persists, it’s recommended to contact your hosting provider for further assistance.
Common WordPress Errors – Common WordPress Errors – Common WordPress Errors – Common WordPress Errors – Common WordPress Errors – Common WordPress Errors – Common WordPress Errors – Common WordPress Errors – Common WordPress Errors – Common WordPress Errors – Common WordPress Errors – Common WordPress Errors – Common WordPress Errors – Common WordPress Errors – Common WordPress Errors – Common WordPress Errors – Common WordPress Errors
24. PHP Errors and How to Turn Off PHP Errors in WordPress
To hide PHP errors, notices, and warnings from the front end of your WordPress website, you can edit the wp-config.php file. Follow these steps:
- Connect to your website using an FTP client or access the file manager in your hosting control panel.
- Locate the wp-config.php file in the root folder of your WordPress installation.
- Open the wp-config.php file in a text editor.
- Look for the line that says:
define('WP_DEBUG', true);
- Replace that line with the following code:
define('WP_DEBUG', false);
- Save the changes and upload the modified wp-config.php file back to your server.
By setting WP_DEBUG to false, you are turning off the display of PHP errors, notices, and warnings on the front end of your website. This is a good practice for production sites to ensure a more professional appearance.
ini_set('display_errors','Off');
ini_set('error_reporting', E_ALL );
define('WP_DEBUG', false);
define('WP_DEBUG_DISPLAY', false);
After saving the changes to the wp-config.php file, make sure to upload the modified file back to your server. Then, visit your website to confirm that the PHP errors, notices, and warnings have disappeared from the front end.
If you are working on a local server or staging area and need to see the errors for debugging purposes, you can turn on error reporting again by editing the wp-config.php file. Replace the code with the following to enable error reporting:
define('WP_DEBUG', true);
define('WP_DEBUG_DISPLAY', true);
This will allow PHP errors to be displayed on the front end, aiding in debugging. Remember to turn off error reporting (define('WP_DEBUG', false);) before deploying your site to a live environment to maintain a professional appearance.
Conclusion
You’re welcome! I’m glad you found the tutorial A Detailed Guide on Troubleshooting Common WordPress Errors helpful. If you have any more questions or need further assistance with WordPress or any other topic, feel free to ask. Your feedback is valuable, and I’m here to help. Happy website managing!
Frequently Asked Questions
Q1. How do I fix corrupted WordPress?
To fix a corrupted WordPress installation, you can try restoring your website from a backup, reinstalling WordPress core files, deactivating plugins and switching to a default theme, or repairing the WordPress database.
Q2. What do managed IT service providers do?
A managed IT service provider is a company that looks after and takes responsibility for providing a specific business technology service to its clients.
Q3. What’s the major problem in WordPress?
The most common and significant issue in WordPress is the “White Screen of Death” (WSOD). This happens when your website shows a blank page due to a critical error that prevents it from loading.
Q4. Is it simple to fix typical WP issues?
Fixing common WordPress problems can be quite straightforward with the right approach. By following online guides, using relevant plugins, and seeking help from the WordPress community, you can often resolve these issues quickly. However, the ease of fixing the problem may depend on its complexity and your technical skills.
Common WordPress Errors – Common WordPress Errors – Common WordPress Errors – Common WordPress Errors – Common WordPress Errors – Common WordPress Errors – Common WordPress Errors – Common WordPress Errors – Common WordPress Errors – Common WordPress Errors – Common WordPress Errors – Common WordPress Errors – Common WordPress Errors – Common WordPress Errors – Common WordPress Errors – Common WordPress Errors – Common WordPress Errors Common WordPress Errors – Common WordPress Errors – Common WordPress Errors – Common WordPress Errors – Common WordPress Errors – Common WordPress Errors – Common WordPress Errors – Common WordPress Errors – Common WordPress Errors – Common WordPress Errors – Common WordPress Errors – Common WordPress Errors – Common WordPress Errors – Common WordPress Errors – Common WordPress Errors – Common WordPress Errors – Common WordPress Errors Common WordPress Errors – Common WordPress Errors – Common WordPress Errors – Common WordPress Errors – Common WordPress Errors – Common WordPress Errors – Common WordPress Errors – Common WordPress Errors – Common WordPress Errors – Common WordPress Errors – Common WordPress Errors – Common WordPress Errors – Common WordPress Errors – Common WordPress Errors – Common WordPress Errors – Common WordPress Errors – Common WordPress Errors
Common WordPress Errors – Common WordPress Errors – Common WordPress Errors – Common WordPress Errors – Common WordPress Errors – Common WordPress Errors – Common WordPress Errors – Common WordPress Errors – Common WordPress Errors – Common WordPress Errors – Common WordPress Errors – Common WordPress Errors – Common WordPress Errors – Common WordPress Errors – Common WordPress Errors – Common WordPress Errors – Common WordPress Errors
Common WordPress Errors – Common WordPress Errors – Common WordPress Errors – Common WordPress Errors – Common WordPress Errors – Common WordPress Errors – Common WordPress Errors – Common WordPress Errors – Common WordPress Errors – Common WordPress Errors – Common WordPress Errors – Common WordPress Errors – Common WordPress Errors – Common WordPress Errors – Common WordPress Errors – Common WordPress Errors – Common WordPress Errors
Common WordPress Errors – Common WordPress Errors – Common WordPress Errors – Common WordPress Errors – Common WordPress Errors – Common WordPress Errors – Common WordPress Errors – Common WordPress Errors – Common WordPress Errors – Common WordPress Errors – Common WordPress Errors – Common WordPress Errors – Common WordPress Errors – Common WordPress Errors – Common WordPress Errors – Common WordPress Errors – Common WordPress Errors
