

If you have your own WordPress.org website, these tips can assist you in enhancing your search engine rankings and attracting more visitors so you have to focus on WordPress SEO:
Choose a Quality Hosting Provider
The hosting you choose has a big impact on your website’s SEO when you start to make your wordpress website, particularly in terms of speed, uptime, and security. So, it’s essential to carefully consider your hosting before creating a website.
If you’re not satisfied with your current web hosting service, don’t worry. You can switch to a different provider. Many good hosting companies are willing to assist you in moving your website from a competitor.
Here are some factors to think about when selecting a hosting provider:
- High Uptime: Even the best hosting providers may experience downtime, but excessive downtime can harm your reputation and business. Look for providers with a high uptime record.
- WordPress Friendliness: Ensure that the hosting service is compatible with WordPress websites. Many quality providers offer plans specifically designed to meet the needs of WordPress sites.
- Free SSL: A hosting feature you shouldn’t overlook is a free SSL certificate. It’s crucial for enabling secure HTTPS encryption on your website, enhancing security for your visitors.
- Location of Server: Consider the server’s location. If your target audience is primarily in the US, having the server located there can help ensure faster website loading times for your US-based visitors.
- Quality Support: Choose a hosting provider with helpful and responsive customer support. Having reliable support makes the overall experience much smoother for you.
Taking these factors into account will contribute to a better hosting experience for your WordPress website.
Certainly! If you’re unsure where to begin, you can consider one of the hosting providers recommended by WordPress. Here are a few options:
These hosting providers are recognized by WordPress and are popular choices for hosting WordPress websites. Each has its own set of features and plans, so you can explore them to find the one that best fits your needs.
Use an SEO-Friendly WordPress Theme
When you initially install WordPress, you’ll likely encounter the default “Twenty Twenty-Something” theme. However, you’ll probably want to customize your site by exploring different themes.
It’s crucial to select a theme that is lightweight and loads quickly for optimal SEO. Website performance plays a significant role in search engine optimization.
You have a wide array of options, including thousands of free themes in the official WordPress theme library, along with numerous premium ones. Take your time to find a theme that suits your site’s style and ensures fast loading times for better SEO performance.

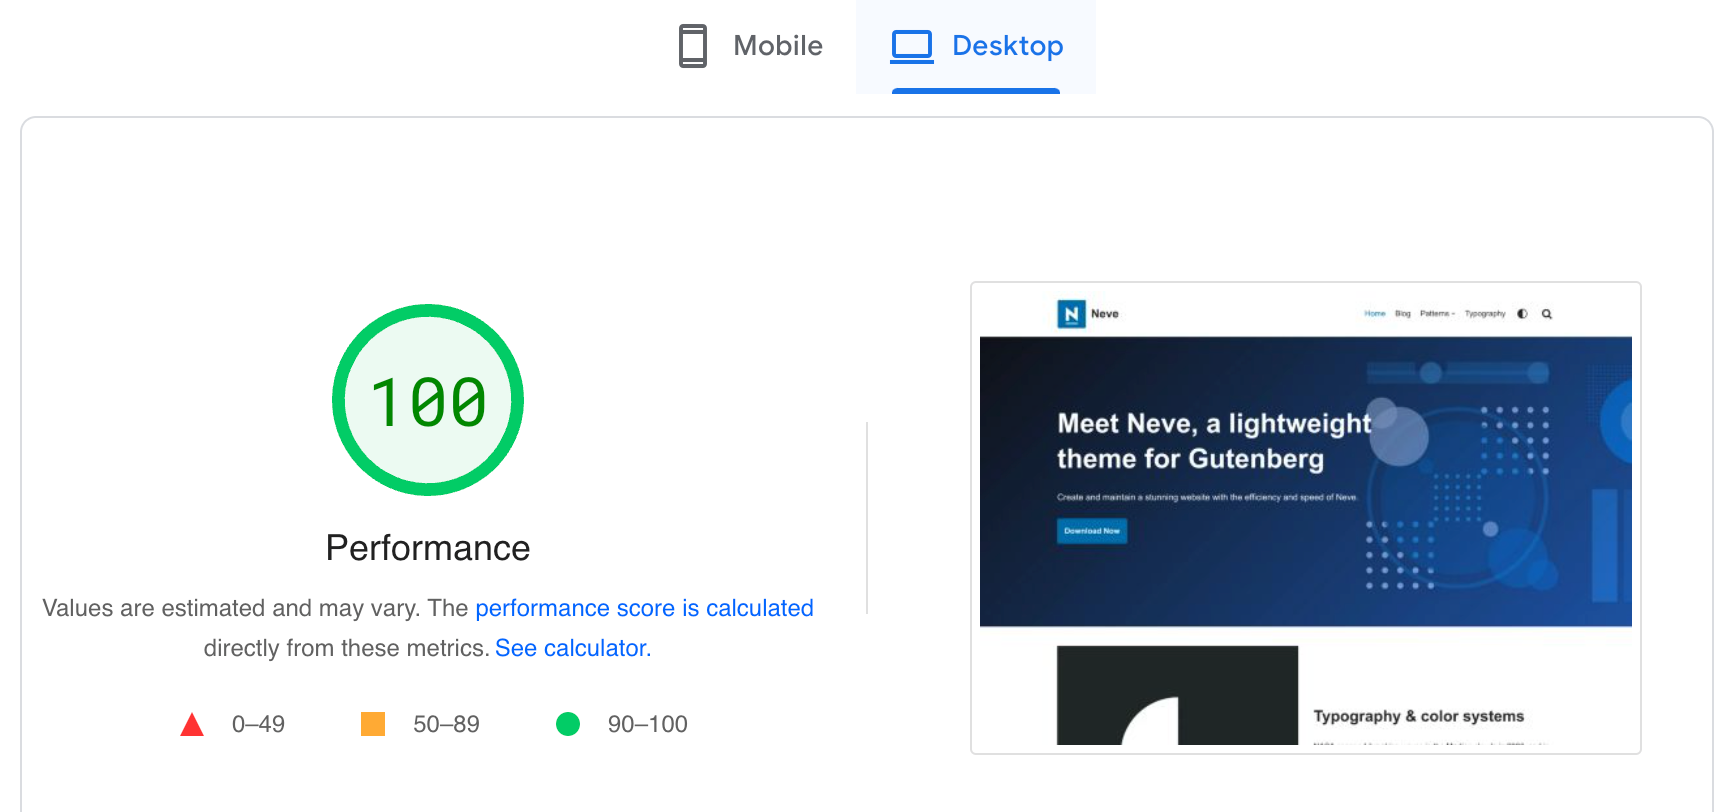
Absolutely! To find a lightweight and fast-performing WordPress theme, you can follow these steps:
Look for themes that performed well in independent tests, such as the “Fastest WordPress Themes” by Kinsta.
- Locate the theme’s demo site on its official website.
- Copy the demo site’s URL.
- Paste the URL into Google PageSpeed Insights and run the tool.
If the performance results show a score of 90 or higher, it indicates that you’ve found a lightweight theme. This score suggests that the theme is optimized for speed and can contribute to a faster and more efficient website.
Make Sure Your Website Is Indexable
Ensuring your site is indexable means that Google can include it in its search results. To check and adjust your site’s visibility settings, follow these steps:
- Navigate to Settings > Reading in your WordPress dashboard.
- Look for a checkbox next to the “Search engine visibility” section at the bottom of the page.

By default, the checkbox should not be checked. However, developers often use it to prevent search engines from indexing the website during the development phase.
If your website is live and ready to be ranked on Google, ensure that the checkbox is unchecked.
Note: that it’s okay to check the box temporarily if your site is still in development, but remember to uncheck it later when you want your website to be indexed and visible in search engine results.
Set Up an SSL Certificate
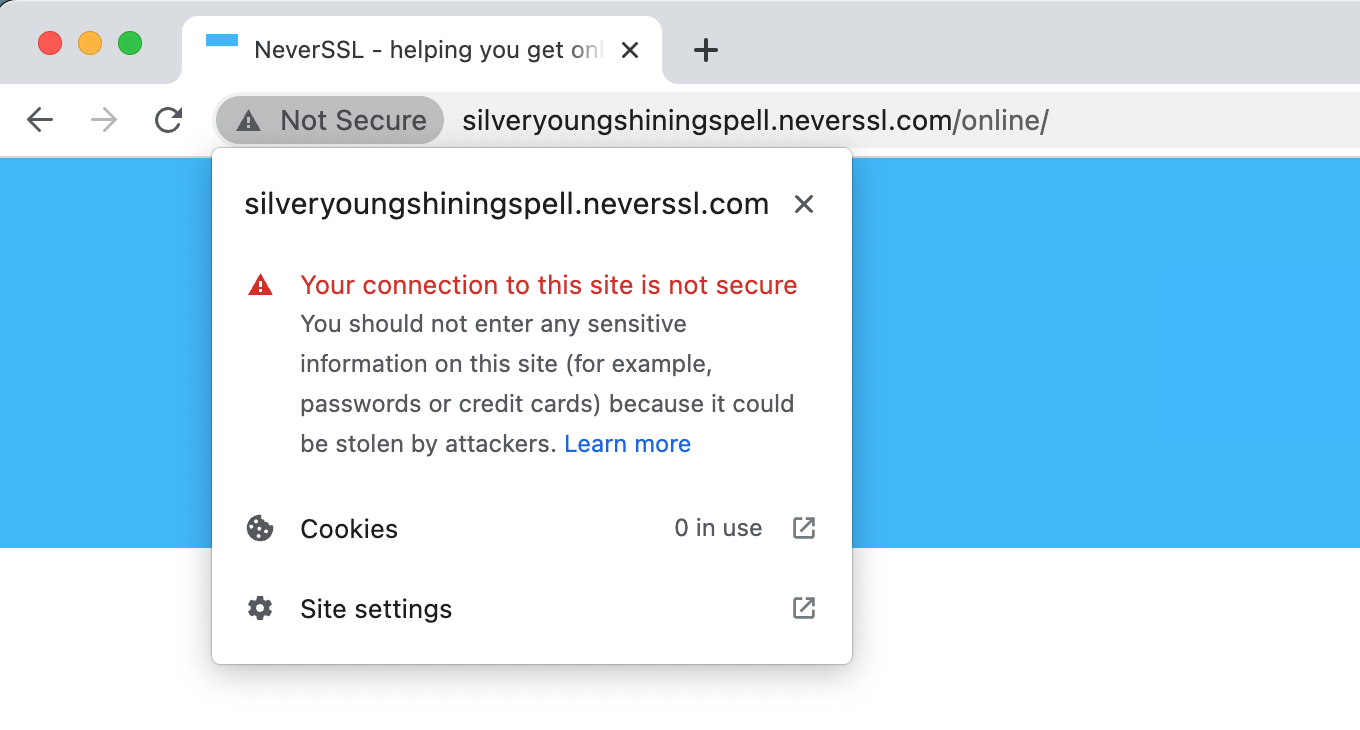
Utilizing a secure HTTPS connection is crucial. It’s a confirmed ranking factor and can improve your site’s ranking on Google.
Moreover, you definitely wouldn’t want your website to display as “Not Secure” in web browsers. Having HTTPS not only enhances security but also contributes positively to the overall user experience.
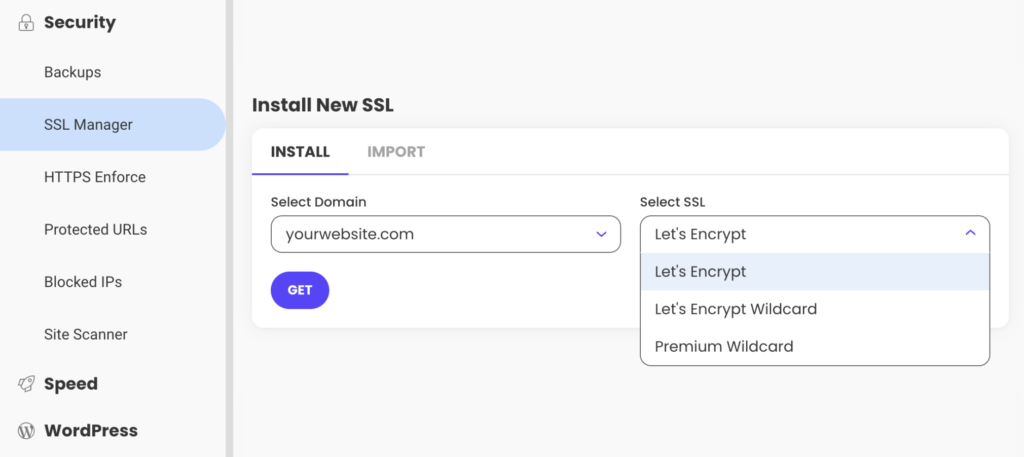
Securing your website’s connection involves encrypting it with an SSL (Secure Sockets Layer) certificate to ensure that data passing through your site is safely encrypted. Here’s a simplified guide:
- Log in to your hosting provider’s admin panel.
- Look for “Security” or “SSL certificate” settings. If you can’t find it, you can search for “[name of your host] SSL certificate settings” on Google. Most WordPress hosting providers offer a free SSL certificate, often known as Let’s Encrypt.
- Select and install the SSL certificate.
For example, if you’re using SiteGround, the setup might look like the one shown in the SiteGround web hosting admin panel. Follow the provided steps to enable a secure and encrypted connection for your website.
To make sure that your SSL certificate is recognized and properly utilized on your WordPress website, you can use the Really Simple SSL plugin. Here’s how to install it:
- In your WordPress control panel, click on “Plugins” in the left menu.
- Select “Add new” and then search for “Really Simple SSL.”
- Once you find the Really Simple SSL plugin, click the “Install Now” button to install it.
This plugin simplifies the process of managing SSL on your WordPress site, ensuring a smooth and secure browsing experience for your visitors.

After installing the Really Simple SSL plugin, follow these steps:
- Click the “Activate” button for the Really Simple SSL plugin.
- Follow the instructions provided by the plugin for the basic settings.
Important Note: If your website has been running without an SSL certificate for an extended period, you might need the assistance of a developer to ensure that everything is set up correctly during the transition.
Congratulations! Your website is now encrypted, providing a secure browsing experience for your visitors.
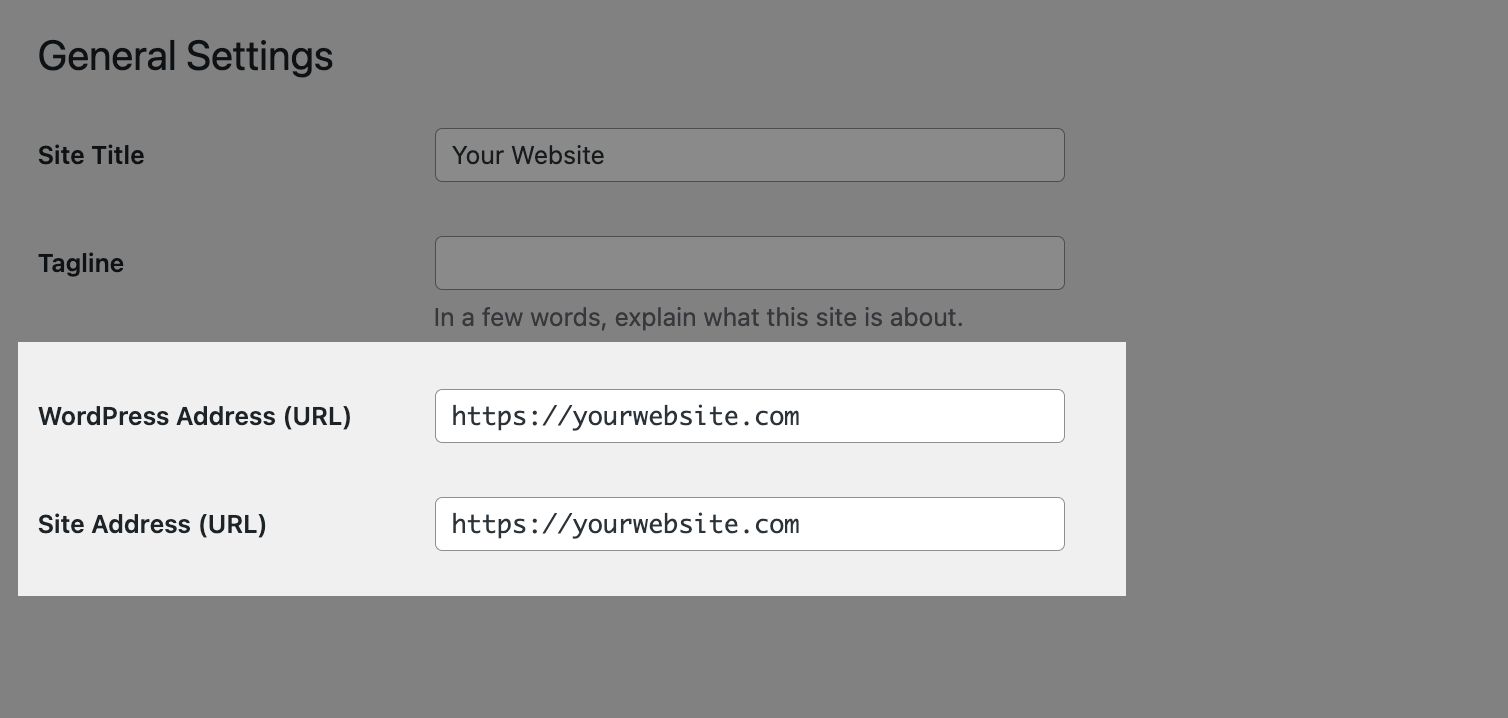
Pick Your Preferred Site Address Format
Choosing your preferred web address format is an important step. In simpler terms:
Decide if you want your URL to be in the format https://www.yourdomain.com or without the www, like https://yourdomain.com.
Here are some key points:
- Google treats www and non-www versions as distinct URLs, so it’s essential to choose one to avoid duplicate content issues.
- From an SEO perspective, there are minimal SEO implications for using either format, as long as you consistently stick to one version.
- Historically, URLs often included www, but nowadays, many websites opt to drop it. The choice is based on your preference.
To set your preferred format:
- In the WordPress dashboard, go to Settings > General.
- Enter your preferred format in both the “WordPress Address” and “Site Address” fields.
Enable SEO-Friendly Permalinks
Creating descriptive permalinks is beneficial for both search engines and human users to better understand your pages. Here’s a simplified guide:
By using descriptive permalinks like https://iffitechsol.com/wordpress-seo, it’s clear that the page is about WordPress SEO. This helps users know what to expect just by looking at the URL.
By default, WordPress uses a less descriptive URL structure like https://iffitechsol.com/?p=7255, which is not ideal.
The recommended permalink format in WordPress settings is the “Post name” structure. This means WordPress will use the title of the post to create the URL. You can also edit the URL in the post editor to make it even shorter and easier to read.
To set this up:
- Go to Settings > Permalinks in the WordPress dashboard.
- Select “Post name” as your preferred permalink structure.

Great note! If you decide to change the permalink structure on an established website, be mindful of potential issues, especially 404 (Page Not Found) errors. To prevent these problems, you’ll need to implement redirects for all the old URLs. This ensures that visitors and search engines are seamlessly directed from the old URLs to the new ones, maintaining the accessibility of your content.
Install and Configure a WordPress SEO Plugin
Utilizing a WordPress SEO plugin can simplify the configuration of basic SEO settings and help you follow best practices. Three popular free WordPress SEO plugins include:
For the purposes of this guide, Yoast SEO will be used. It’s chosen for its widespread usage and integration with Semrush, making it a comprehensive tool for SEO optimization.
Installing Yoast SEO
To install Yoast SEO, follow these simple steps:
- In your WordPress control panel, click on “Plugins” in the left menu.
- Select the “Add new” button.
- Search for “yoast seo.”
- Once you find Yoast SEO, click the “Install Now” button.
- After installation, click “Activate” to activate the plugin.
Now, Yoast SEO is installed and ready to assist you in optimizing your WordPress site for search engines.

Configuring Yoast SEO
After activating Yoast SEO, the plugin will guide you through the “First-time configuration” process. Here’s what you’ll do:
- Run Yoast’s SEO data optimization function.
- Provide basic information about your website.
- Connect your social profiles.
This step-by-step setup ensures that Yoast SEO is tailored to your specific website and helps you make the most of its features for optimizing your content and improving your site’s SEO.

In addition to the initial setup, it’s a good idea to customize your title tag separator in Yoast SEO. Here’s how you can do it:
- Go to Yoast SEO in your WordPress dashboard.
- Navigate to “Search Appearance.”
- Click on “Title Separator.”
In this section, you can choose the symbol that will be used as the separator in your title tags. This small detail contributes to the visual presentation of your website in search engine results, so selecting a separator that aligns with your branding or style is a thoughtful step in optimizing your site’s appearance.

We will go through other SEO settings available in Yoast SEO in some of the following steps.
Submit Your Sitemap to Google Search Console
An XML sitemap is a file that lists all your website’s pages in a format that search engine crawlers can easily understand. It aids in the discovery of new pages and provides essential information, such as the last update date.
WordPress automatically creates a basic XML sitemap, which is typically found at:
https://www.yoursite.com/wp-sitemap.xmlIf you’re using Yoast SEO, it enhances the default XML sitemap and turns it on. To complete the process, all you need to do is submit the sitemap URL to Google Search Console (GSC).
Note: While Google usually discovers your site on its own, submitting your XML sitemap to Google Search Console can expedite the process and potentially help Google better understand the structure of your site.
Finding the Sitemap URL in Yoast
Here are the steps to ensure that the XML sitemap feature is enabled in Yoast SEO:
- In your WordPress dashboard, go to “Yoast SEO” in the left menu.
- Click on “General.”
- Navigate to the “Features” tab.
- Scroll down to the “XML sitemaps” section.
- Verify that the sitemap is enabled by default (the toggle button should be set to “On”). If it’s not enabled, switch it on.
By ensuring that the XML sitemap feature is activated, you’re allowing Yoast SEO to generate and manage an enhanced version of your sitemap, providing valuable information to search engines about your website’s structure.

Click the small question mark symbol, then select the “See the XML sitemap” link. Your sitemap will open in a new tab, and it will look similar to this:
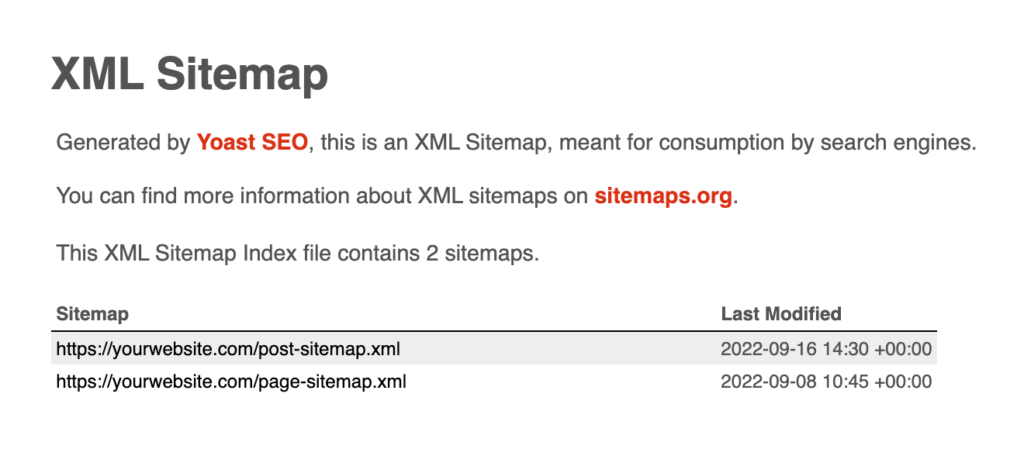
Copy the URL of your sitemap, and then go to Google Search Console. This is the next step in the process to submit your sitemap to Google for indexing.
Submitting the Sitemap URL to Google Search Console
Absolutely! Here’s a simplified guide:
- Log in to your Google Search Console account.
- Click on “Sitemaps” in the left menu.
- Paste the URL of your sitemap into the provided form.
This step allows you to submit your sitemap to Google, helping the search engine better understand your website’s structure and content.
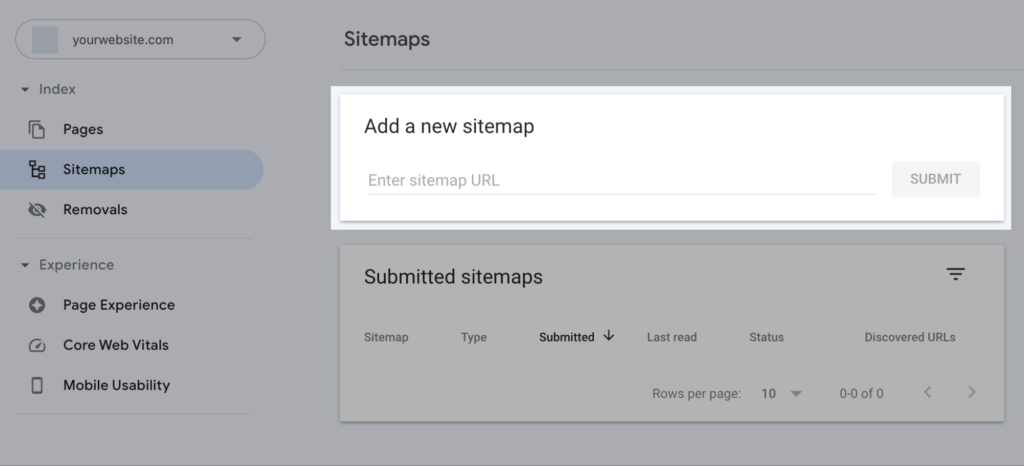
Great! After pasting the URL of your sitemap into Google Search Console, simply hit “Submit,” and you’re all set!
Side note: If you don’t have a Google Search Console (GSC) account yet, you can follow a guide, such as the one by Kinsta, to learn how to verify your site. Also, check out our comprehensive guide to Google Search Console for additional tips and tricks.
Noindex Unimportant Pages
WordPress generates various page taxonomies and archive pages, such as monthly archive pages. For instance, a page with posts from December 2023 would have a URL like this:
https://yourwebsite.com/2023/12/These archive pages may not offer significant value to users, and you might not want them to be indexed and receive traffic from Google. To decide whether a page should be indexed, ask yourself if users would find it valuable in search results.
If the answer is no, you can use Yoast to set the page to “noindex,” preventing Google from indexing it. Here’s how:
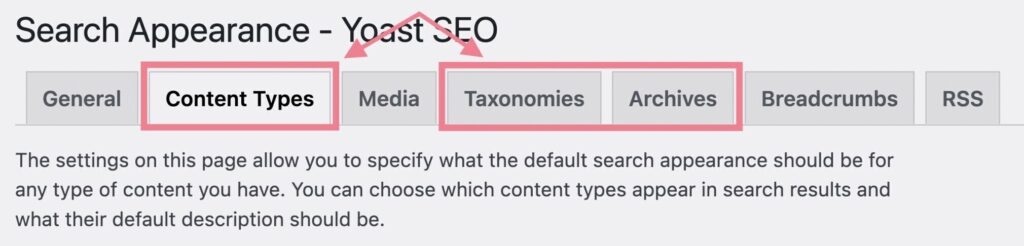
- In Yoast SEO, click on “Search Appearance.”
- Under each of the “Content Types,” “Taxonomies,” and “Archives” tabs, you’ll find “noindex” settings.
By using these settings, you can control which pages should or should not be indexed, improving the relevance and quality of your site’s search results.
Under each category in Yoast SEO, you’ll find options to decide whether you want a specific type of content to be indexed on Google. These options give you control over which content types, taxonomies, or archive pages should or should not appear in search engine results. It’s a valuable tool for optimizing your site’s visibility and ensuring that only relevant and valuable content gets indexed.
Certainly! Let’s go through the different types and recommended actions step by step:
Content Types:
- Posts: Definitely index these. You want your posts to appear in search engine results.
- Pages: Definitely index these. You want your pages to appear in search engine results.
- Templates: These are usually created by page builders. Noindex them.
Taxonomies:
- Category pages: Usually useful for users, especially for bigger blogs and ecommerce sites. (See Step 13 to make the most out of them.)
- Tag pages: Usually low-value pages. Noindex them.
- Format-based archives: Rarely used, low-value pages. Turn off the usage of these archives completely, or noindex them.
Archives:
- Author archives: Can be useful for multi-author blogs. Otherwise, turn off the usage of these archives completely, or noindex them.
- Date archives: Turn off the usage of these archives completely. Or noindex them.
By following these recommendations, you can control how different types of content on your WordPress site are indexed by search engines, optimizing the visibility of your valuable content in search results.
10. Plan the Architecture of Your Site
Absolutely! When it comes to WordPress SEO, having a simple site architecture with a clear page hierarchy is crucial. This not only makes it easier for search engines to crawl but also enhances the navigation experience for visitors.
To achieve this, it’s beneficial to plan ahead. You can use simple tools like pen and paper, a Google Sheet, or even a mind mapping platform such as MindMeister. Here’s a quick guide:
- Create a free account on MindMeister.
- Select the “Org Chart” template as it provides a good visual representation of a website structure.
Using these tools allows you to map out a structured and organized hierarchy for your website, which can positively impact both SEO and user experience.

Absolutely! Planning your website’s architecture is crucial, and you can start by outlining and nesting all the pages and categories your website might include. Here’s an example of a simple website architecture:

Ensuring that your pages are easily accessible within a few clicks is a good practice for effective site architecture. A helpful guideline is to make sure that no page or post requires more than three clicks to reach from the homepage. This approach improves the user experience by simplifying navigation and making important content readily available to visitors.
WordPress Pages vs. Posts
WordPress has two default types of content: posts and pages.
- Posts: Typically used for dynamic content like blog posts. They are displayed in reverse chronological order on your blog and can be organized by categories and tags.
- Pages: Used for static content like About Us, Contact, and Services. Pages are typically used for content that doesn’t change frequently and doesn’t follow a chronological order.
Understanding the distinction between posts and pages is fundamental when organizing and structuring your WordPress site.
Use Pages for:
- Static content that doesn’t need categorization.
- Content that may not have a specific author.
- Examples: “About” page, “Privacy Policy” page, landing pages.
Use Posts for:
- Blog posts that are organized with categories and tags.
- Content that shows the author and published date.
- Displayed in reverse chronological order on the website.
In WordPress, you have the flexibility to choose whether your homepage will be an index of your latest posts or a static page. You can configure this in Settings > Reading, allowing you to tailor your website’s structure to your specific needs.

If you choose the static homepage option in WordPress, you have the ability to specify both the page that will serve as your homepage and the page where your blog posts will be displayed. This provides you with the flexibility to create a customized front page while still maintaining a separate section for your blog posts. You can configure these settings in WordPress under “Settings > Reading.”
Avoiding Keyword Cannibalization
Absolutely! Having a well-planned site architecture helps you avoid keyword cannibalization, a common issue where your pages compete with each other in Google results. John Mueller from Google emphasizes the importance of avoiding diluted site value by having fewer, stronger pages rather than numerous weaker ones.
Here’s how you can prevent keyword cannibalization:
- Assign a target keyword to every page: Clearly define the main keyword each page is optimized for.
- Ensure each page has a unique target keyword: Avoid overlap in the focus keywords of your pages to prevent competition.
Note: Identifying the right keywords is crucial, and we’ll cover how to do this in Step 15 ( Do Keyword Research).
To find existing cannibalization issues, you can use tools like Semrush’s Position Tracking tool, specifically the “Cannibalization” tab, to identify affected pages and take corrective actions.
Frequently Asked Questions
Is WordPress Good for SEO?
While WordPress is inherently SEO-friendly as a content management system (CMS), it’s important to recognize that success in organic search requires ongoing effort and optimization. WordPress provides a solid foundation, but achieving high visibility in search engine results still involves strategic content creation, keyword optimization, link building, and other SEO practices. The combination of a robust CMS like WordPress and a well-executed SEO strategy can contribute significantly to the success of your website in organic search.
Does Google Favor WordPress?
Google doesn’t show favoritism towards any specific CMS (Content Management System). While WordPress is often considered a strong choice for SEO due to its user-friendly nature, extensive plugin options (like SEO plugins such as Yoast), and a large community, the ultimate success in SEO is determined by various factors such as content quality, relevance, user experience, and technical optimization.
WordPress provides a solid foundation and tools to implement effective SEO strategies, but it’s the combination of good practices and valuable content that truly wins in the SEO battle. Choosing WordPress can certainly contribute positively to your SEO efforts, but the overall success depends on the comprehensive execution of SEO best practices.
Which SEO Plugin Is Best for WordPress?
When considering all-in-one SEO plugins, three of the most widely used options are Yoast SEO, All-in-One SEO, and Rank Math. Additionally, there are numerous excellent WordPress SEO plugins designed for specific SEO tasks.
