

A client dashboard in WordPress can be a powerful tool to streamline your business and provide clients with a centralized place to access their information, manage their projects, and collaborate with your team. To create a client dashboard in WordPress, you need a plugin that provides the features you need and integrates seamlessly with your website. The Dashboard Welcome for Elementor Plugin is one such plugin that can help you create a professional and user-friendly client dashboard in WordPress.
Overview
A client dashboard is a crucial element in any business website as it provides a centralized location for clients to access important information, interact with the business, and manage their accounts. With the right tools and plugins, creating a client dashboard in WordPress is easier than ever. In this article, we will walk you through the steps to create a client dashboard in WordPress using the Dashboard Welcome for Elementor plugin.
Why Use A Client Dashboard?
A client dashboard is a great way to streamline your business and provide a better user experience for your clients. With a client dashboard, clients can access all the information they need in one place, without having to navigate through your website. This includes account information, orders, invoices, support tickets, and more.
Choosing The Right Plugin
There are many plugins available for creating a client dashboard in WordPress. However, we recommend using the Dashboard Welcome for Elementor plugin. This plugin is easy to use, customizable, and provides a range of features for creating a professional-looking client dashboard.
How To Create A Client Dashboard In WordPress with Dashboard Welcome for Elementor Plugin:
- Install The Dashboard Welcome for Elementor Plugin To get started, you need to install the Dashboard Welcome for Elementor Plugin on your WordPress website. You can do this by going to the WordPress plugin repository, searching for the plugin, and clicking on the “Install Now” button.
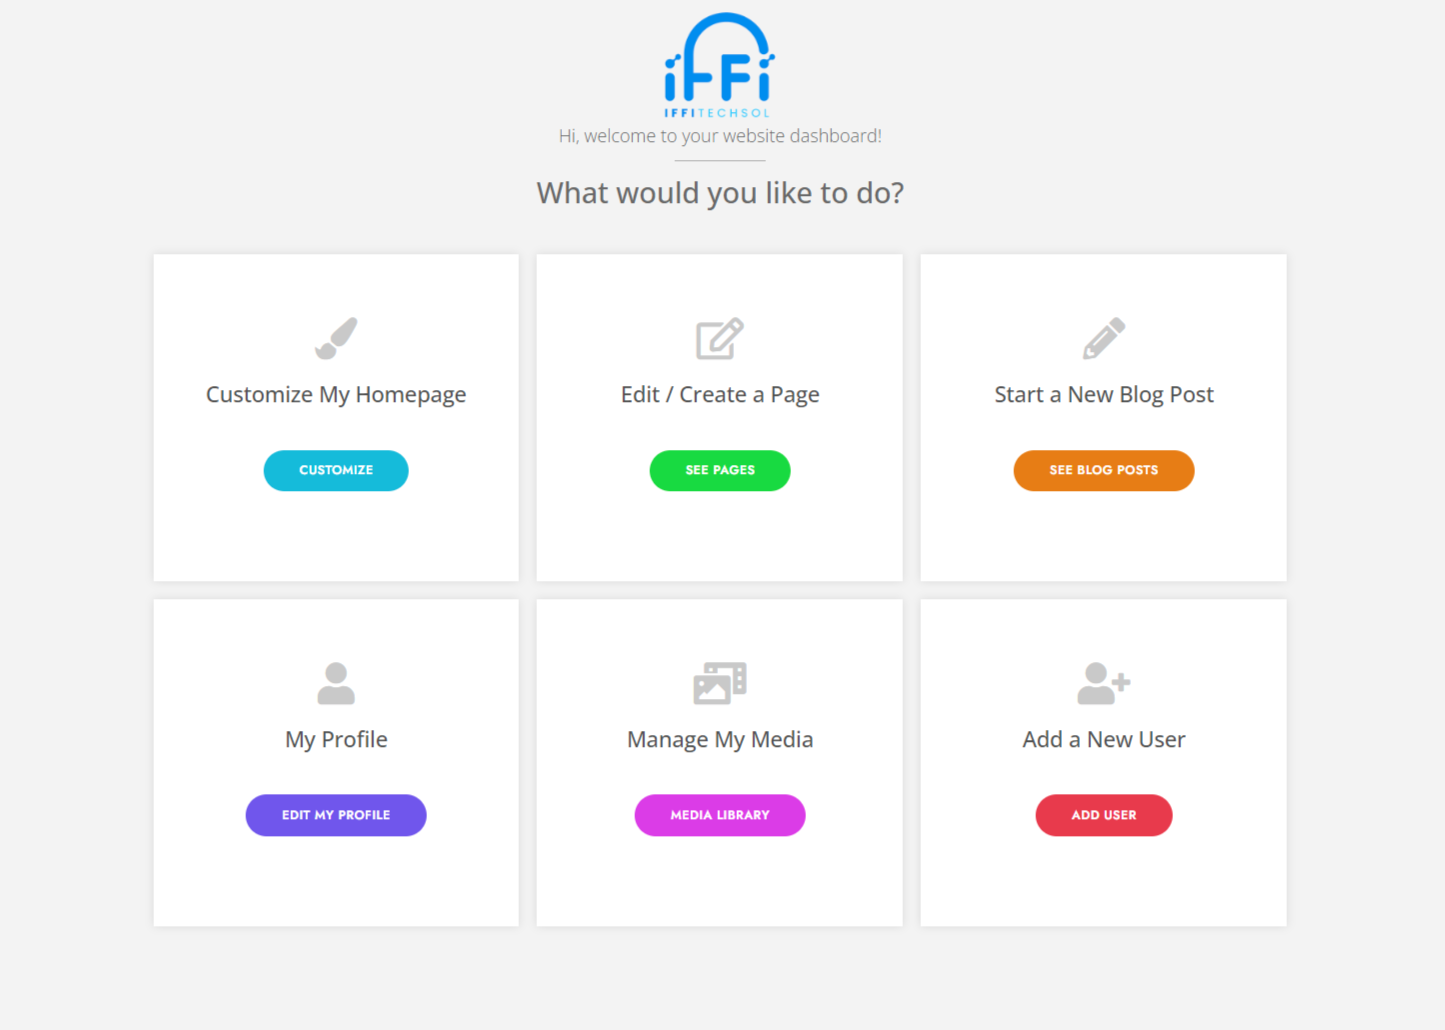
- Set Up The Client Dashboard Once you have installed the plugin, you need to set up the client dashboard. To do this, go to the “Dashboard Welcome” section in your WordPress dashboard and select “Add New”. This will take you to a page where you can customize the look and feel of your client dashboard.
- Customize The Client Dashboard With the Dashboard Welcome for Elementor Plugin, you can customize your client dashboard to match your brand and provide clients with the information they need. You can add your company logo, change the color scheme, and add widgets to display information such as recent projects, client account details, and more.
- Add Widgets to The Client Dashboard The Dashboard Welcome for Elementor Plugin provides a range of widgets that you can use to display information on your client dashboard. Some of the widgets available include recent projects, client account details, and a task manager. You can also add custom widgets to display information that is specific to your business.
- Provide Access to The Client Dashboard Once you have set up your client dashboard, you need to provide clients with access to it. You can do this by creating user accounts for each client and granting them access to the client dashboard. You can also set up different levels of access for different clients, allowing them to view only the information that is relevant to them.
- Test The Client Dashboard Finally, you should test your client dashboard to make sure that it works as expected and that clients can access the information they need. You can do this by logging in as a client and verifying that the information displayed on the dashboard is correct.
Getting Started with Dashboard Welcome for Elementor
To get started with the Dashboard Welcome for Elementor plugin, you first need to install and activate the plugin on your WordPress website. This can be done through the WordPress plugin repository or by uploading the plugin files to your website.
Once you have installed and activated the plugin, you can start creating your client dashboard. To do this, you will need to create a new page in WordPress and add the Dashboard Welcome for Elementor widget to the page.
Customizing Your Dashboard
With the Dashboard Welcome for Elementor plugin, you have full control over the design and layout of your client dashboard. You can add and remove widgets, change colors and fonts, and customize the look and feel of your dashboard to match your brand.
Adding Widgets to Your Dashboard
The Dashboard Welcome for Elementor plugin provides a range of widgets that you can use to add important information and functionality to your client dashboard. These widgets include account information, order history, invoices, support tickets, and more.
Conclusion
Creating a client dashboard in WordPress is easy with the right tools and plugins. With the Dashboard Welcome for Elementor plugin, you can create a professional-looking client dashboard that provides a better user experience for your clients. By streamlining your business and providing a centralized location for clients to access important information, you can improve your business and provide a better service for your clients.

